A couple of weeks ago, inspired by a friend, I decided to build a small Chrome Extension. When I jumped into the action, I was pleasantly surprised to discovered that building Chrome Extensions is pretty much the same as doing good ol' web development. However, regardless of whether or not you have done any web work, you will find that building extensions is rather straightforward and simple. :)
This tutorial assumes that you understand some basic html and javascript, and instead focuses on what is particular to Chrome Extensions (which is surprisingly not that much).
For this tutorial, I will use my Hidden: Auto-Incognito application as a basis to explain how to build, test, and publish your own Chrome Extensions. You can look at the complete code in my git repo.
* Follow me @konukoii for more interesting content!
Shameless Self-Plug:
But before we start, let me do some shameless self-promotion! My Extension allows you to filter websites to automatically open them in Incognito mode.
For example, filter the keyword "bank" and every time you go to sites such as "www.bankofamerica.com" or "www.usbank.com", they will be immediately redirected to Incognito Mode, leaving no trace in your history or address bar suggestions.
Available now at your local google webstore! [link]
OK, now that we got that out of the way, let's begin:
Basic Structure
The overall structure for a chrome extension relies on a couple of things:
- A Manifest file: This file declares the extensions name, version, icon, permissions, html/js files, etc.
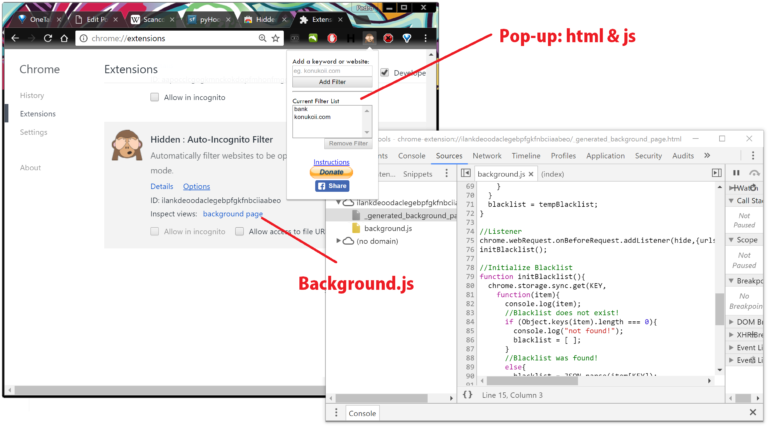
- A Popup: If you want to have a small pop-up appear when your icon is clicked on the toolbar, you will want to have a separate .html and .js file to build in whatever functionality you want for it. Notice that the google policy will not allow you to run javascript from inside this html, thus you must have all that functionality on a separate .js file.
- A Background process: If you want your app to be running as a "daemon/service", you will need to set up its own background javascript process.
- An Option screen: This is an extra screen that chrome offers as a settings screen for your extension.
Application
 |- manifest.json
 |- popup.html
 |- popup.js
 |- background.js
 |- options.html
 |- options.js
 |- icon.png
 |- ...Potentially other .js, .html, .png, etc assets that you might need
Of course, aside from the Manifest, you don't necessarily have to have all of these things. Your chrome extension might not need a pop-up, background, or options page. It all really depends on what you need for your application to work.
Manifest
The first thing you have to do is set up your manifest. The manifest will contain all necessary declarations needed to package your program. As you can see the first few items are pretty standard; name, version, description, etc. The permissions section will relate to all the special Chrome APIs that you use. If you don't know which permissions you need to declare, you can always check it out here.
In our specific case we will want:
- webRequest: Chrome API that allows us to catch http requests before they get sent.
- webRequestBlocking: Will allow us to block the http requests that we caught.
- history: Will allow us to modify the history
- tabs: Will allow us to open,close, modify new tabs
- <all_urls>: Will allow us to act on all urls. Notice that chrome needs you to specify which urls can be manipulated by the extension. You can specify urls directly or using a regular expression.
Next, the browser_action section specifies the toolbar icon and what popup will be displayed when the icon is clicked. Furthermore, the background page defines the scripts that should be running "as a service". These are executed as soon as chrome loads and can add listeners for certain events.
The next sections are pretty self explanatory, however it is important to explain the web_accessible_resources. This particular line is allowing chrome to include files to your extension which you can then access from either the popup, background, or option page.
For a more expansive list of options check here.
{
"manifest_version": 2,
"name": "Hidden : Auto-Incognito Filter",
"short_name": "Hidden",
"version": "1.2",
"description": "Automatically filter websites to be opened under Incognito mode.",
"permissions": [ "webRequest", "history", "webRequestBlocking", "tabs", "storage", "<all_urls>" ],

"browser_action":{ "default_icon":"icon128.png", "default_popup":"popup.html" },
"icons": { "16": "icon16.png", "48": "icon48.png", "128": "icon128.png" },

"background": { "scripts": ["background.js"] },

"options_page":"index.html",

"web_accessible_resources": [ "images/screenshot.png" ],

"incognito":"not_allowed"
}
Background
The background file is simply a pure javascript file that will execute as soon as Chrome runs. Within it, you can add listeners, define functions that pop-ups will call, etc.
In Hidden, the background file is where the magic happens.
First we want to set up listeners that will catch user requests and if these requests match a filtered website, we will redirect them to an Incognito window. If you understand Javascript the following should be very straight-forward, however let's break it down step by step.
- First we will initialize the blacklist (filters). I decided to save these using the chrome.storage.sync api, because it allows for cross-device synchronization.
//Listener
blacklist = [ ];
Key = "HIDD3N";
initBlacklist();

//Initialize
Blacklist function initBlacklist(){
    chrome.storage.sync.get(KEY, function(item){
        console.log(item);
        //Blacklist does not exist!
        if (Object.keys(item).length === 0){
            console.log("not found!");
            blacklist = [ ];
         }
         //Blacklist was found!
        else{
            blacklist = JSON.parse(item[KEY]);
            console.log("found!")
         }
    });
}- Second we will create a listener from chrome.webRequest.onBeforeRequest that will activate every time a new http request is made. Be aware, that sometimes chrome will pre-fetch requests before you actually type the complete address and hit enter. That is why we must make sure on function hide to double check that the tab where it is coming from is not undefined (as is the case when pre-fetch occurs).
chrome.webRequest.onBeforeRequest.addListener(hide,{urls:["<all_urls>"]},["blocking"]); - The next step is to build our function hide (the one that gets executed every time there is a new request). This function simply checks if the request matches a filter and it is from a "main_window" meaning: the main html file (as opposed to an image, or external file). If it matches, the tab where the request came from will be closed and instead a new incognito window will be opened.
//Helper Function: Is a URL blacklisted
function blacklisted(url){
    for (var i = 0; i < blacklist.length; i++){
        if (url.includes(blacklist[i])){
            return true;
        }
    }
    return false;
}


//Callback Function to Hide a new requested site!
//Note: Chrome.tabs.get will throw a bunch of errors because when it pre-fetches websites, it does so from a tab that does not exist.
function hide(info){
    if (blacklisted(info.url)){
        chrome.tabs.get(info.tabId, function(tab){
            if (info.type=="main_frame" & tab != undefined){
                url = info.url.toLowerCase();
                console.debug(info);

                chrome.tabs.remove(info.tabId); //Remove the tab before user travels to url
                chrome.windows.create({url: url , incognito: true}); //Open same url in incognito

             } //Endif
         }); //EndTabs
         return {cancel: true};
     } //EndBlacklist
} //EndHide
The second step is to create some functions to add and remove filters, these will be used by the pop-up. To add, I turn my blacklist list into a json-formatted string and save it with a given key ("HIDD3N"). Then I set it on the storage.sync, which as described above, will sync with all of a user's computers. To remove, you simply follow the inverse process. If you are not familiar with how JSON works, you should check out this tutorial.
//Add a new item to blacklist
function addblacklist(item){
    blacklist.push(item.toLowerCase());
    blacklist.sort();
    toSave = {};
    toSave[KEY] = JSON.stringify(blacklist);
    chrome.storage.sync.set(toSave,function(){console.log("saved new case")});
}

//Remove item from blacklist
function removeblacklist(item,callback){
    blacklist.splice(blacklist.indexOf(item.toLowerCase()),1);
    blacklist.sort();

    toSave = {};
    toSave[KEY] = JSON.stringify(blacklist);
    chrome.storage.sync.set(toSave,callback);
}
Pop-Up
Most chrome extensions will have a pop-up that will allow them to interact quickly with the user. In the case of Hidden, I wanted to setup a simple controller so that a user could quickly check, add, and remove filters.
The html for this was extremely simple, it consisted of an input field, a select field and two buttons.
<body>
 <font face="Tw Cen MT">Add a keyword or website:</font><br>
 <input placeholder="eg. konukoii.com" id="newitem"></input><br>
 <button type="button" id="btadd" style="width:100%">Add Filter</button><br>
 <hr>
 <font face="Tw Cen MT">Current Filter List</font><br>
 <select name="blacklist[]" id="itemlist" multiple style="width:100%"></select><br>
 <button type="button" id="btrm" style="float:right">Remove Filter</button><br><br>

 <div align="center">
     <a href="#" id="instr">Instructions</a>
 </div>
</body>
Now, do to Chrome policies you are not allowed to run javascript straight from the pop-up's html file so instead you must declare your own separate file. This script isn't that interesting for those of you that already know javascript, however there are just a couple of things to point out:
- On the add and remove methods, we will use the background.js addblacklist/removeblacklist functions that we coded before. To reach these functions you will want to call 'chrome.extensions.getBackgroundPage()'
- Since you are not allowed to directly add functions in the html file, you can do so by simple adding Event Listeners to buttons, fields, etc.
//Add Item Button Action
function additem(){
    console.log("adding...");
    newitem = document.getElementById("newitem").value;
    if (newitem.length <= 2){
       return
    }
    if (newitem.value != ""){
       chrome.extension.getBackgroundPage().addblacklist(newitem);
       fill_blacklist();
       document.getElementById("newitem").value = "";
    }
    else{
       newitem.focus();
    }
}

//Remove Item Button Action
function rmitem(){
    console.log("rming...");
    newitem = itemlist.value;
    if (newitem != ""){
       chrome.extension.getBackgroundPage().removeblacklist(newitem,fill_blacklist);
       rmbtndisable()
    }
    else{
       itemlist.focus();
    }
}

//Remove Button Disabling
function rmbtndisable(){
    if (itemlist.value == ""){
       btrm.disabled = true;
    }
    else{
       btrm.disabled = false;
    }
}


//Fills the Blacklist with the Filtered Keywords
function fill_blacklist(){
    itemlist.innerHTML = ""
    bl = chrome.extension.getBackgroundPage().blacklist;
    if (bl != []){
       for (i = 0; i < bl.length; i++){
          var opt = document.createElement("option");
          opt.value = bl[i];
          opt.innerHTML = bl[i];
          itemlist.appendChild(opt);

       }
    }
}


//Show Instructions
function showInstructions(){
   chrome.tabs.create({
      url: chrome.extension.getURL("index.html")
   });
}


//Run this when you load!
document.addEventListener('DOMContentLoaded', function () {
    var btadd = document.getElementById("btadd");
    var btrm = document.getElementById("btrm");
    var itemlist = document.getElementById("itemlist");
    var instr = document.getElementById("instr");

    btadd.addEventListener('click',additem);
    btrm.addEventListener('click',rmitem);
    itemlist.addEventListener('change',rmbtndisable);
    instr.addEventListener('click',showInstructions);
    btrm.disabled = true;
    fill_blacklist();


    //Key Bindings to make the Extension a bit more user friendly
    document.addEventListener("keydown", function(e){
       if(e.keyCode === 13 && document.activeElement.id == 'newitem') {
          additem();
       }

       if(e.keyCode === 8 || e.keyCode === 46) {
          if (document.activeElement.id == 'itemlist' && btrm.disabled === false){
              rmitem();
          }
       }
    });


});
Option Page
I'm not really going to go into a lot of detail with the options page. All this is, is an extra page that chrome allows you to show when you right-click on an app and select Options. You can also redirect a link in your pop-up by directing the link to href=chrome.Extension.getURL("<your options file>.html").
Refer to the Manifest section above to see how you are supposed to declare your option site and any other extra assets (images, js, etc.) that you might need.
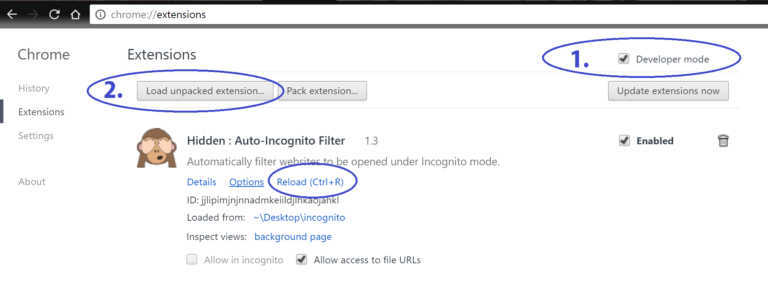
Testing
Obviously, you will want to deploy locally and test as you code. Thankfully this is rather simple. Go to the extensions tab in chrome (accessible via the chrome menu or by going to chrome://extensions. In there, enable "Developer Mode" and click on "Load unpacked extension". Then select your extension. If you make further changes to your program you can always hit the reload button.
Another extremely useful thing you will be able to do from here is access your extension's background page.
It's worth noting that you can debug all your .js and .html pages as you would normally expect using the Developer Tools (accessible through Ctrl + Shift + i)
Publishing
Publishing is extremely simple and fast. Simply go to the Chrome Webstore Developer Dashboard. You will need to pay a 1 time $5 fee to activate your account, but after that you can simply click on "Add new item" and follow the onscreen instructions. Within 1 hour you will have your app online and ready to rock!
Conclusion
If you want to take a closer look at the code for Hidden, you can find it here.
I hope this guide has been useful and allowed you to trim some time in getting started with your extension. Feel free to drop me a line with any questions, comments, or suggestions.
Cheers!