If you have ever used the free Wi-Fi provided by hotels, airports, or even starbucks. You might notice that some of these don't allow you to actually browse the web without first logging in, paying some fees, or maybe just accepting some terms of service. This type of networks employ something called 'Captive Portals'. In this post, we will be explaining how to bypass these 'Captive Portals' such that we can browse the web without registering, paying fees, or even accepting the ToS. (Be warned, in some places doing this is illegal. I share this for purely in the spirit of intellectual pursuit, and don't condone any illegal activities).
* Follow me for more hacking content!
Follow @konukoii
Captive Portals
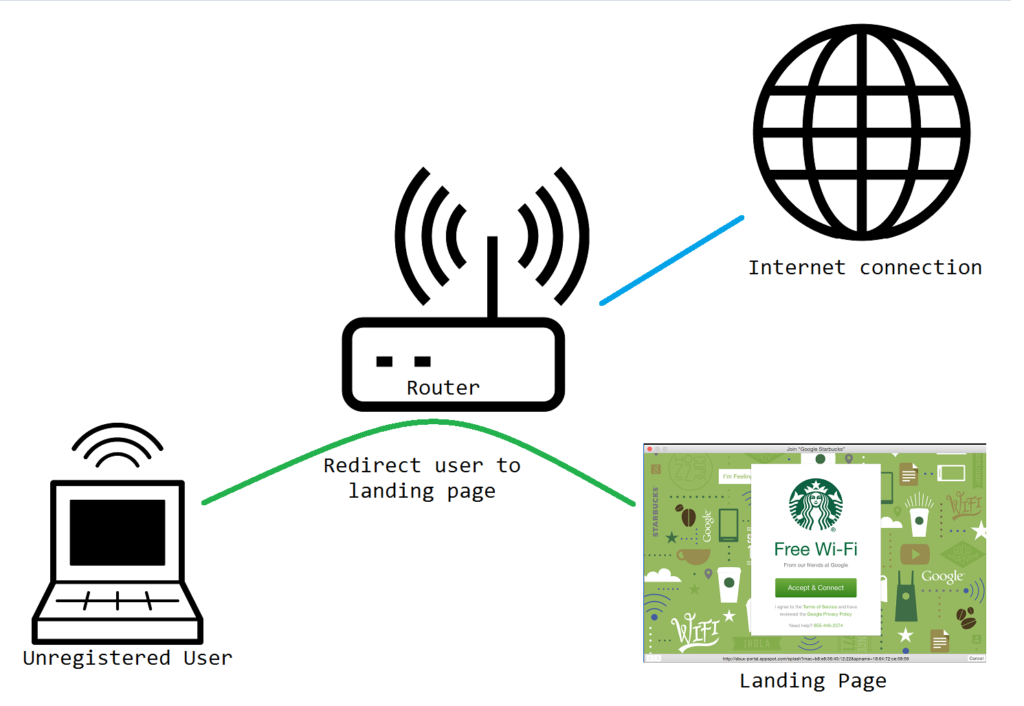
Captive Portals work by redirecting internet traffic from unauthenticated users to a 'landing page' where users must register, pay, etc. Once users are registered in the system their internet traffic is allowed to exit the local network and out onto the interwebs!
The majority of the time these captive portals are set up using the Chilispot software, so check it out if you are curious about setting up one yourself (maybe for a guest network in your house?).
Escape Strategy
Most captive portals block common protocols such as HTTP/HTTPS (commonly used when web browsing), SSH/FTP (commonly used to connect to other computers), and pretty much all other protocols...except DNS.
Domain Name System (DNS) Protocol is a method used to translate domain names (such as www.google.com, www.facebook.com, etc.) to their IP address (216.58.216.14, 157.240.11.35, etc.). You can think of this as an address book that maps people to their address ("Steve lives on 1234 Main St.").
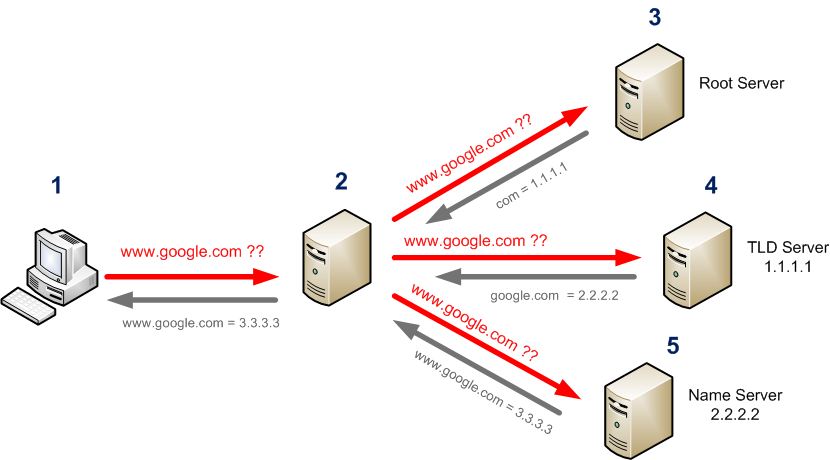
DNS is quite unique in the sense that when one queries "What is google.com's address?", if the local DNS server doesn't know the answer, it is relayed to another DNS server, and eventually it will reach Google's DNS, which will then respond "It is on 216.58.216.14".
Therefore, our escape strategy will be to create a 'DNS Server' with which we will communicate, but instead of asking it for given addresses, we will "tunnel" data through it. In other words, our queries will be something like "What is tunnel.mydomain.com.[PAYLOAD]'s address?" and our server will answer something like: "It is on [PAYLOAD]"
To an outside observer it will look like we are just doing simple DNS queries to find the location of our website, but in reality we will be tunneling information back and forth, thus bypassing any captive portal.
To do all of this, we will use a program called Iodine, which contains a server software (Iodined) and a client software (iodine)
Setting up Iodine Server
First, we will need to set up a server. This is going to be the endpoint that we are going to connect, so we need this to be publicly accessible. It can be either an old computer on your home, a paid VPS, or perhaps a $5 Raspberry Pi Zero.
Second, you will need to get a domain and set the DNS Records of that domain to the IP of the server. I suggest getting a 88¢ domain at Namecheap.com. I suggest getting something short (as DNS packets are quite small and your domain name will be in each and every on of those packets; thus, the smaller the name the more space you'll have for the payloads.)
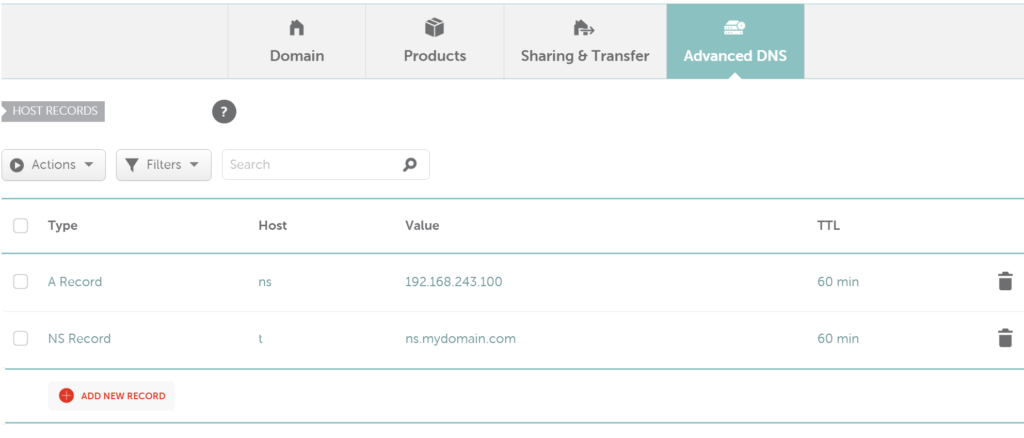
Once you get your site, change the DNS records to point to your server IP. Notice the A record is the basic address entry stating that ns.mydomain.com is located at the given IP, and the NS record is stating that there is a DNS server (our "fake" DNS Server) at the location of ns.mydomain.com.
Once you have the domain setup, all you have left to do is install and run Iodine on your server.
For Linux (Ubuntu, Mint, Debian):
# Option #1: Easy Install
sudo apt-get install iodine

# Option #2: Compile Yourself
git clone https://github.com/yarrick/iodine.git
cd iodine; make install
For OSX:
brew install caskroom/cask/tuntap
brew install iodine
To Run Iodine:
sudo iodined -c -f 10.0.0.1 -P password t.mydomain.com
# - c   Disable checking the client IP address on all incoming requests. Makes connections faster.
# - f   Maintains the Iodine server on the foreground. (Good for debuggin') You can leave this out if you want to the server to run on the background.
# - P   Allows you to define some password so that only you can use the Iodine server.
# 10.0.0.1 This is going to be the "private network address" that the server will set up. This can be any other "private" addresses (192.162.0.1, etc.)
# t.mydomain.com This corresponds to the NS record you previously set up on Namecheap.
For more info, feel free to check Iodine's manpage. Once you have the server running you are ready to start tunneling!
Setting up Iodine Client
BEFORE you are actually trapped on the captive network, make sure you have your linux client (for windows, consider using a Virtual Machine) ready by installing the proper tools:
sudo apt-get install iodine proxychains firefox
Once you find yourself in the captive network, you can just run the Iodine client by:
sudo iodine -f -P password t.mydomain.com
Once you have done that, and your connection is set up, you will notice that 10.0.0.1 (or whatever address you set up on the server) is now directly connected to your server. Think of it as a router if you want. You will be able to SSH to it directly if you want 🙂
To actually do web-browsing you will want to open a socks4 tunnel:
ssh -D 1990 10.0.0.1
Then you will want to change the proxychain config file (found at: /etc/proxychains.conf) and add this as the last line:
socks4 127.0.0.1 1990
Lastly you can run firefox (or any other program using proxychains) by issuing the following command:
proxychains firefox
Disclaimers
In most networks, doing this is illegal (or at the very least frowned upon) and I don't condone any illegal behavior.
If you are a network administrator and you are interested in stopping this sort of tunneling from happening on your network, feel free to check out the following article: Making DNS Tunnels Unusable.
Great post, mustash boy 🙂
Great work, one day i will try this to bypass mobile internet data limit.