Git is most likely one of the most useful tools I "discovered" in college. I strongly encourage CompSci students to learn how to use it as early as possible, mainly because it will help you while working on your class projects and homework, but also because you will most likely be using this when you get to the workforce. Sadly it is very uncommon for teachers to teach this, so students are left to either 1. figure it out on their own or 2. suffer. Luckily, git is pretty easy to use and there are tons of tutorials. I decided to build this very simple tutorial with the emphasis being on "teaching you the most useful bare-bones that you need to know in 5 minutes or less".
So what is Git?
Git is a Source Version Control system. It helps you keep track and save your code as you develop, so that you don't accidentally damage working code and have to spend hours trying to figure out what error you did. Git also allows you to work with multiple partners without having to exchange source files through emails and merging them manually.
What is Github?
You can use Git locally on your computer and keep repositories there, however if you want to save those repositories in the cloud Github provides free space to keep your public repos. If you are a student they even offer a Student Pack with some goodies such as free private repos.
Enough Talking! Let's use it!
The following intro shouldn't take more than 5 min to complete.
- Download Git: https://git-scm.com/ (Github offers a visual Git suite. This is a bit of an overkill tho.)
- Once you install it, you should be able to open your Command Prompt and type
gitand see a huge help message. (If you don't, you might need to add git to PATH.) - Cool, now let's do your first git repository! Create a new folder in your Desktop (or wherever) and open a command prompt inside it. Then press the magic words:
git init - Yay! you just created your fist git repo. Now let's add something to it. Create a new file (called hello.py) and type some random stuff inside it.
- If you want to check the status of your git repo, just do:
git status. You should now see a screen telling you that hello.py is "Untracked". Untracked means that your repository is not paying attention to changes in this file. - To track and add this file to the repo, simply do:
git add [put name of the file here].If you check the status you should now see it as added. Added only means that you are ready to commit this file, but you haven't yet saved it. - To save your files, you "commit" them. When you commit is up to you, some people love committing all the time. I personally tend to commit only when I have compiling software. To commit do:
git commit -m "Type a meaningful message here."- If you mess up and forget to add the -m or don't close quotes or some other random thing happens. Vim might pop open and tell you to please include a commit msg. What you can do is press i then right your message and then press ESC and write ":wq" to save and exit.
- I want to do a small pause here. A lot of people disregard the commit message or write whatever shennanigans. I'd advice against this, try to write a good explanation of what you've done or what you accomplished in this latest commit. This is going to be super useful if you are trying to go back and check for an older commit.
- Also don't write obscenities in it. I had a teammate that did this for a project we had to turn in to our professor, it looked really unprofessional and going back and changing commit messages is really annoying.
- Now modify your file. And do a
git statusagain. Ha! now your file seems to be modified. You cangit addandgit commitagain to commit the new changes. - Woohoo! Now you know the basics. Wasn't that easy 🙂 Keep reading to find out how to save copies of this repo on github.
Here is a transcript of what we did if you are more of a visual person:
//1. Create the directory for our repo
C:\>mkdir test_git

//2. Traverse to the directory
C:\>cd test_git

//3. Initalize the repo.
C:\test_git>git init
Initialized empty Git repository in C:/test_git/.git/

//4. Create some random file inside our repo.
C:\test_git>echo print 'hi!' > hello.py

//5. Let's check the status
C:\test_git>git status
On branch master

Initial commit

Untracked files:
 (use "git add [file] ;..." to include in what will be committed)

 hello.py

nothing added to commit but untracked files present (use "git add" to track)

//6. Prepare your file to be commited)
C:\test_git>git add hello.py

//7. Commit your file.
C:\test_git>git commit -m "Test commit #1"
[master (root-commit) 6cb95dd] Test commit #1
 1 file changed, 1 insertion(+)
 create mode 100644 hello.py

//8. modify file
C:\test_git>git echo print 'hi! #2' > hello.py

...git add hello.py; git commit -m "test commit #2" ... etc.
Advanced Techniques
Now we have just barely scratched the surface of the things that you can do with git. I want to give you some more tricks.
→ Pushing your commit to github (or some other git external repo).
- Go to Github.com and create your account.
- Click on the huge green button saying "Create new Repository"
- Create the new repo under whatever name you want.
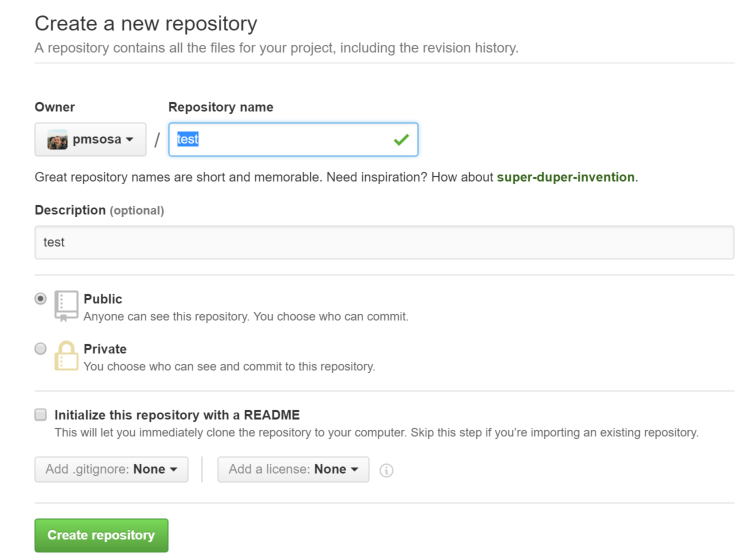
- At this point its a bit obvious but follow the instructions on screen. Since we already created a repo on our computer, we just want to add the remote repo direction to our local repo.
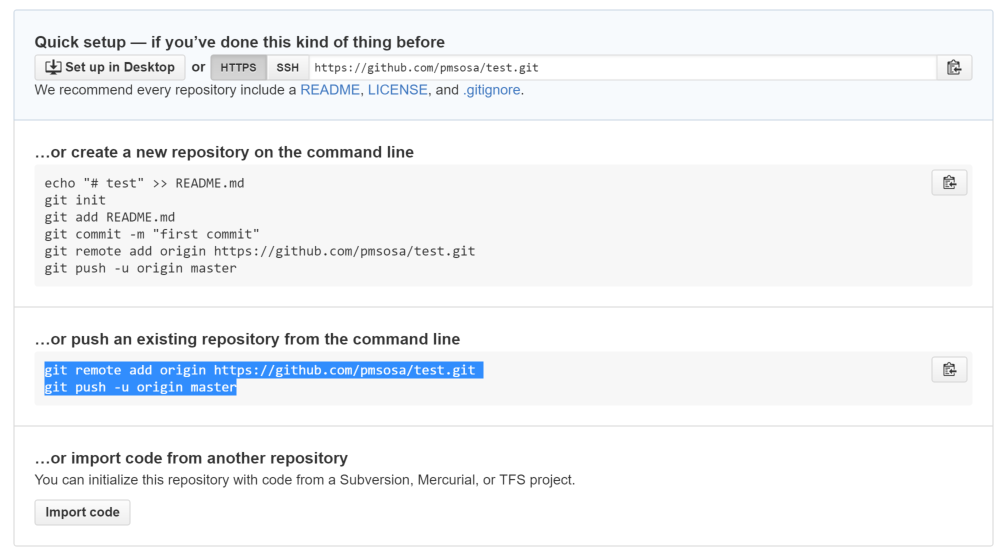
- Once you are done adding the repo. Every time you want to push the repo from your local machine to your github repo, just do:
git push origin master.In this case origin refers to the name of your repo (when you add it you choose how to call it. You can rename them to whatever you want.) and master refers to the branch you want to push to; In git you are allowed to have multiple development branches so its important to get in the habit of explicitly refering which is the one you are pushing to.
→ Helpful git commands
git diff > This allows you to view the changes from your current modified files to the last committed ones. It comes in handy if you see a modified file, but have no idea what it is that you changed.
git x.
git log > This allows you to view all the commits a chronological list of all the commits you have done.
git checkout [modified file name] > This will discard a modified file and return it to it's original state when it was last committed.
git pull [origin] [master] > This will pull the latest version from your [origin] repo.
→ Branches
I'm not going to go fully in depth on branches, but I just want to touch on them. If you are working with multiple partners it might be beneficial for you to work with multiple branches so that you are not conflicting as you develop. This is specially useful if one person is developing something experimental that might otherwise insert a lot of instability, thus you want to save your little proof of concept separate from main development.
A really awesome visual explanation on how to use branches can be found over at the Atlassian website
Sources and Further Reading
- Prof. Conrad at UCSB. Shoutout to the only guy (that I know of) actively teaching git at the university.
- Atlassian tutorial has a super thorough guide.
- Github page has a good tutorial too + more info unique to github.
- Wikipedia has some interesting meta info on git
Recent Comments