I've been doing a lot of vibecoding lately. You know; those spontaneous project ideas where you think "hmm wouldn't it be cool if..." and before you know it you're five tabs deep in stack overflow conversations, datasheets, and figuring out how to talk to a microcontroller. These aren't the projects that go on your resume. They're the ones that exist purely in the space between curiosity and "I bet I could make that work."
Tripwire started as one of those thoughts: What if my door could tell me not just when it opened, but whether it was me who opened it?
And sure, I could buy a door sensor for $20 on Amazon, but where's the fun in that? Also, wouldn't it be cool if it could distinguish who is opening the door?
The idea was simple enough to be achievable, weird enough to be interesting, and practical enough that I might actually use it. Perfect vibecoding territory: A chance to poke around with ESP32 development, Bluetooth protocols, and embedded systems without needing to become an expert in any of them first.
The result is a small ESP32-based door monitor that does three things:
- Detects when a door opens or closes (magnetic reed switch)
- Checks if your phone's Bluetooth is nearby (authentication of sorts)
- Sends you a notification distinguishing between "you opened the door" and "someone else opened the door"
Building it was fun. I learned some things. It works. Let me walk you through how it came together.
Git Repo: https://github.com/pmsosa/Tripwire
Components Needed
This is a fairly straightforward project, so you'll only need:
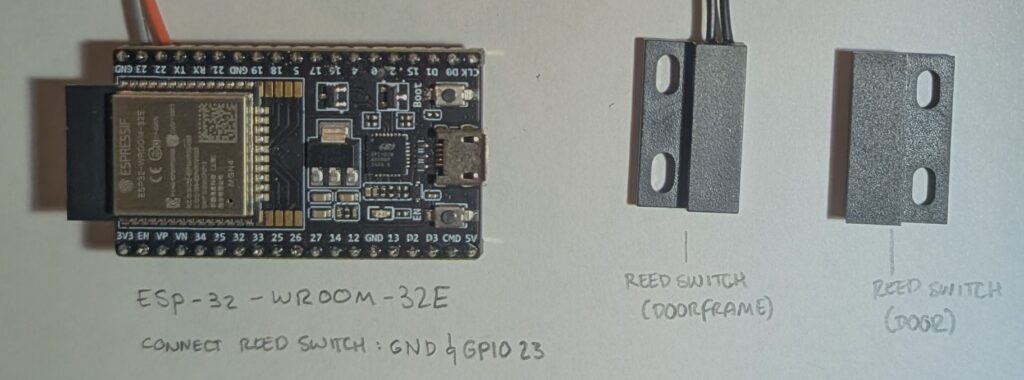
- ESP32-WROOM-32E development board (Amazon)
- Magnetic reed switch (Amazon)
- Jumper wires (or you can always solder them)
Getting Your Feet Wet With ESP32
If you haven't worked with ESP32 before, you're in for a treat. These little boards are absurdly capable for the price: WiFi, Bluetooth, plenty of GPIO pins, and a development ecosystem that's very mature.
I built this using VS Code (or Cursor of that's your jam) with the ESP-IDF extension, which is Espressif's official development framework. The setup can be a bit finicky the first time (installing toolchains, setting paths, the usual embedded development ritual), but once it's working, it's actually quite pleasant.
The ESP-IDF extension adds a toolbar to the bottom of VS Code that becomes your command center. You'll want to get familiar with this toolbar at the bottom:
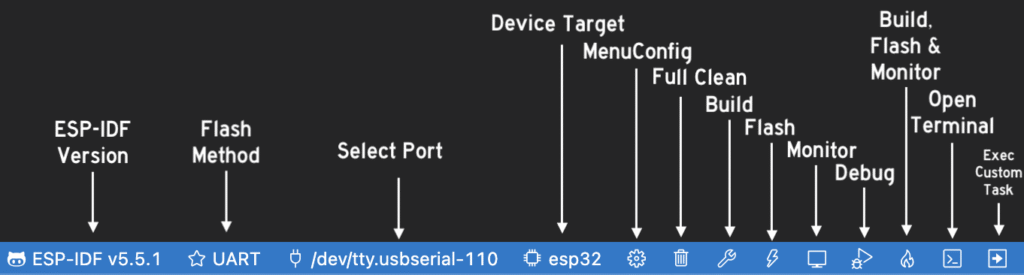
Buttons In order from left to right:
- ESP-IDF Version: Select which version of the framework you're using
- Flash Method: Set to UART (unless you know what you're doing)
- Select Port: Choose the /dev/tty device for your board (usually something like /dev/ttyUSB0 or /dev/cu.usbserial-*)
- Device Target: Select your specific ESP32 variant (for an ESP32-WROOM-32E you can set it as ESP32)
- MenuConfig: Allows you to enable/disable different features (e.g. Bluetooth settings, WiFi settings, etc.)
- Build: Compiles your project (Step 1)
- Flash: Upload to the board (Step 2)
- Monitor: Open the serial console to see logs (Step 3)
- Build, Flash, & Monitor: The "I changed something and want to see if it works" button
- Open Terminal: Opens an ESP-IDF terminal with all the paths configured
- Execute Custom Task: For running specific build tasks
That "Build, Flash, & Monitor" becomes your best friend. Write code, hit the button, watch the logs scroll by, discover you forgot a semicolon, repeat.
One quick tip: if your ESP32 won't flash or isn't showing up on any serial port, you might need to hold down the BOOT button while plugging it in. It's one of those unwritten rules of ESP32 development that everyone learns the hard way.
The Reed Switch: Your Door's Simplest Oracle
At the heart of this project is something beautifully simple: a magnetic reed switch. It's two tiny metal contacts inside a glass tube that touch when a magnet gets close. Mount one piece on the door, one on the frame, and you've got yourself a door sensor.
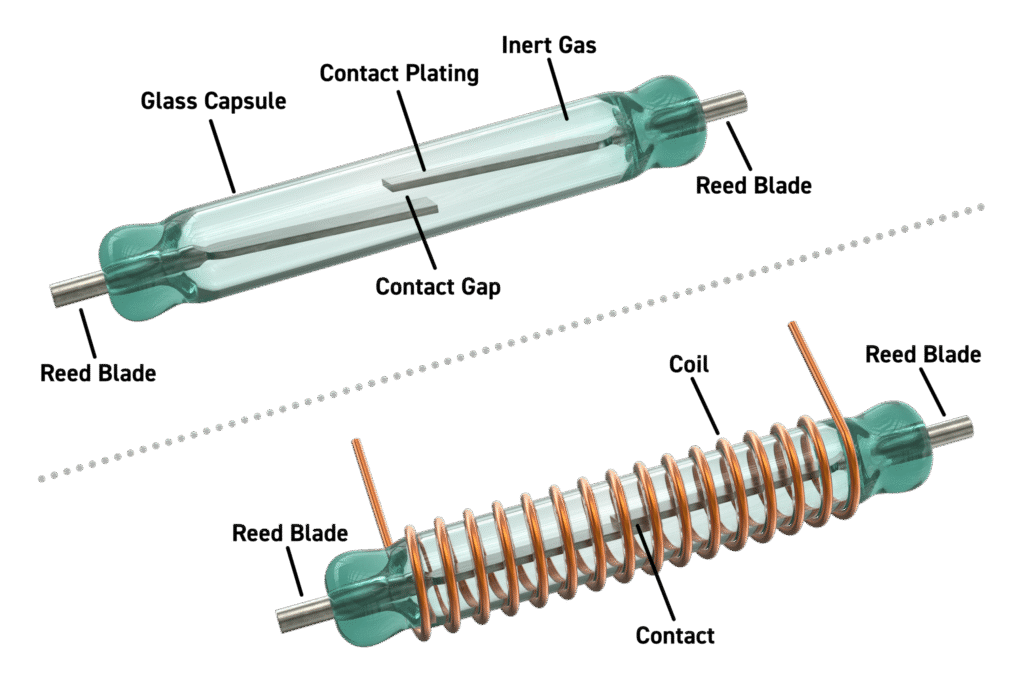
(Image Source: https://www.pickeringrelay.com/introduction-reed-relay-basics-part-1)
Wire it up to GPIO 23 with a pull-up resistor (the ESP32 has internal pull-ups you can enable in software), and suddenly your microcontroller can know the state of your door.
// Configure reed switch pin as input with pull-up resistor
gpio_config_t reed_switch_config = {
    .pin_bit_mask = (1ULL << REED_SWITCH_PIN),
    .mode = GPIO_MODE_INPUT,
    .pull_up_en = GPIO_PULLUP_ENABLE,
    .pull_down_en = GPIO_PULLDOWN_DISABLE,
    .intr_type = GPIO_INTR_DISABLE
};
gpio_config(&reed_switch_config);
The logic is straightforward: when the magnet is close (door closed), the switch conducts and pulls the GPIO pin low. When the door opens, the switch opens and the pull-up resistor brings the pin high. Read the GPIO state, and you know if your door is open or closed.
I added a simple state change detector in the main loop: check the current state, compare it to the last state, and if something changed, do something about it. Debouncing wasn't even necessary with the reed switch; these things are remarkably clean in their switching.
The satisfying part is how analog it all feels. No protocols, no complex sensor fusion: just a magnet, a switch, and a wire. Sometimes the simplest solutions are the most reliable.
Calling Out to ntfy.sh
For notifications, I used ntfy.sh, which is probably one of the most delightfully straightforward notification services out there. You POST a message to a URL, anyone subscribed to that topic gets a push notification. No accounts, no API keys, just HTTP and a unique topic name.
The code to send a notification is refreshingly simple. In the send_ntfy_notification function:
// Build the message based on door events
char message[256];
create_notification_message(message, sizeof(message), events, count, authenticated);

// Send it via ntfy.sh
esp_http_client_config_t config = {
    .url = NTFY_URL,
    .method = HTTP_METHOD_POST,
    .timeout_ms = 10000,
};

esp_http_client_handle_t client = esp_http_client_init(&config);
esp_http_client_set_header(client, "Content-Type", "text/plain");
esp_http_client_set_post_field(client, message, strlen(message));
esp_http_client_perform(client);
Worth noting: this uses HTTP rather than HTTPS in my implementation. If that matters for your use case, ntfy.sh does support reserved topics with authentication, or you could swap in a different notification service. For my purposes, picking a sufficiently obscure topic name worked fine.
The beauty of ntfy.sh is how little ceremony there is. No OAuth flows, no API key management, no account creation. Just pick a topic and start pushing notifications. Sometimes the simplest tools are the most fun to work with.
Bluetooth SPP: The Authentication Hack That Actually Works
Here's where this project gets fun.
The idea was simple: when the door opens, check if my phone is nearby. If it is, I probably opened the door. If it's not, someone else did. This gives me contextual awareness that a simple door sensor lacks.
I used Bluetooth Classic SPP (Serial Port Profile) for this, and the approach is... let's call it "creative."
Normally, Bluetooth SPP works like this:
- Two devices pair with each other (exchange keys, establish trust)
- Later, when they want to connect, they say "hey, remember me?" and establish a connection
- They exchange data over a virtual serial port
But pairing is annoying. You have to interact with your phone, accept a pairing request, maybe enter a PIN. For a door sensor that needs to work seamlessly, that's a dealbreaker.
So here's what I did instead: I initiate an SPP connection to my phone's Bluetooth MAC address without pairing. My phone, quite reasonably, says "who are you? I don't know you" and rejects the connection.
But the rejection is enough.
The act of my phone responding (even to deny the connection) proves my phone is there. It's Bluetooth-based authentication without authentication. The absence of a response proves my phone isn't nearby.
The magic happens in the spp_callback function, which handles all the different responses from the phone:
void spp_callback(esp_spp_cb_event_t event, esp_spp_cb_param_t *param) {
    switch (event) {
        case ESP_SPP_INIT_EVT:
            ESP_LOGI(TAG, "SPP initialized");
            break;

        case ESP_SPP_OPEN_EVT:
            if (param->open.status == ESP_SPP_SUCCESS) {
                ESP_LOGI(TAG, "SPP connection opened successfully - phone authenticated");
                spp_connected = true;
                spp_handle = param->open.handle;
            } else {
                ESP_LOGI(TAG, "SPP connection failed but phone responded: %d - phone authenticated", param->open.status);
                spp_connected = true;  // Any response means phone is present
            }
            break;

        case ESP_SPP_CLOSE_EVT:
            ESP_LOGI(TAG, "SPP connection closed - phone responded");
            if (param->close.handle != 0) {
                spp_connected = true;  // Connection attempt got a response
            }
            spp_handle = 0;
            break;

        default:
            break;
    }
}
Notice that spp_connected gets set to true whether the connection succeeds OR fails. Success means we connected. Failure means the phone rejected us. Both prove the phone is there. No callback at all means timeout—phone isn't nearby.
Then in try_connect_to_phone, we just initiate the connection and wait for the callback:
bool try_connect_to_phone(void) {
    spp_connected = false;

    // Initiate connection attempt
    esp_err_t ret = esp_spp_connect(ESP_SPP_SEC_NONE, ESP_SPP_ROLE_MASTER, 1, phone_mac_addr);
    if (ret != ESP_OK) {
        ESP_LOGW(TAG, "SPP connect failed to start: %s", esp_err_to_name(ret));
        return false;
    }

    // Wait for callback (success, failure, or timeout)
    uint32_t timeout_ms = 3000;
    uint32_t start_time = esp_timer_get_time() / 1000;

    while (!spp_connected &&
           ((esp_timer_get_time() / 1000) - start_time) < timeout_ms) {
        vTaskDelay(pdMS_TO_TICKS(200));
    }

    return spp_connected;  // True if we got ANY response
}
Could someone spoof my phone's Bluetooth MAC and fool this? Sure, technically. But if someone's breaking into my house, they're probably not going to go through the trouble of Bluetooth MAC spoofing—they'll just use a crowbar.
There's something deeply satisfying about solutions that abuse protocols in technically-incorrect-but-practically-useful ways. It's like discovering that the "wrong" way to use something actually works better for your specific case.
Keeping Secrets Secret: The build.sh Pattern
One thing I wanted to get right was keeping secrets out of git. Your WiFi password, your phone's Bluetooth MAC, your ntfy.sh topic—none of that should ever touch version control.
The ESP-IDF build system uses a file called sdkconfig to store configuration values, but that file gets regenerated constantly and is a pain to gitignore properly. So I built a simple template system.
There's a sdkconfig.defaults.template file with placeholders:
CONFIG_DOOR_WIFI_SSID="__WIFI_SSID__"
CONFIG_DOOR_WIFI_PASSWORD="__WIFI_PASSWORD__"
CONFIG_DOOR_PHONE_BT_MAC="__PHONE_BT_MAC__"
CONFIG_DOOR_NTFY_URL="__NTFY_URL__"
And a .env file (gitignored) with your actual secrets:
export DOOR_WIFI_SSID="YourWiFiNetwork"
export DOOR_WIFI_PASSWORD="YourPassword"
export DOOR_PHONE_BT_MAC="aa:bb:cc:dd:ee:ff"
export DOOR_NTFY_URL="https://ntfy.sh/your_unique_topic"
The build.sh script reads your .env, does a simple sed replacement on the template, and generates the real sdkconfig.defaults:
sed -e "s/__WIFI_SSID__/$DOOR_WIFI_SSID/g" \
    -e "s/__WIFI_PASSWORD__/$DOOR_WIFI_PASSWORD/g" \
    -e "s/__PHONE_BT_MAC__/$DOOR_PHONE_BT_MAC/g" \
    -e "s|__NTFY_URL__|$DOOR_NTFY_URL|g" \
    sdkconfig.defaults.template > sdkconfig.defaults
Then it cleans the old config and runs the build:
rm sdkconfig  # Force regeneration
idf.py build
Is this the most sophisticated secret management system? No. Does it work perfectly for a hobby project? Absolutely. Your secrets stay local, the template stays in git, and you don't accidentally push your WiFi password to GitHub.
It's one of those patterns that's simple enough to understand at a glance but robust enough to actually use.
The Accessibility of Vibecoding
Here's the thing about projects like this: they make things accessible that might otherwise feel out of reach.
Would I call myself an ESP32 expert after building Tripwire? Not even close. I probably understand maybe 15% of what's actually happening under the hood. I couldn't tell you the intimate details of the Bluetooth stack, or explain exactly how the FreeRTOS scheduler works, or debug a timing issue in the WiFi driver.
But I do know a few things now that I didn't know before. I know how to wire up a reed switch. I know that Bluetooth SPP exists and roughly how it works. I know how to structure an ESP-IDF project, and how to debug IRAM space issues. Little bits and pieces that I picked up along the way, not through deep study, but through just... building the thing.
That's what vibecoding gives you. Not mastery, but familiarity. Not expertise, but enough knowledge to be dangerous (in a good way). It lowers the barrier from "I would need to dedicate weeks to learning this properly" to "I could probably hack something together this weekend."
The ESP32 ecosystem is particularly good for this kind of exploration. The boards are cheap enough that bricking one doesn't hurt. The tooling is mature enough that you're not fighting basic setup issues. The documentation exists, even if you have to hunt for it sometimes. And there's enough community knowledge out there that when you get stuck, someone else has usually gotten stuck in the same place.
The code's on GitHub if you want to see the full implementation. Fair warning: there are several questionable engineering decisions and at least one instance of me arguing with the ESP32's Bluetooth stack at 2am. But it compiles, it works, and I learned something building it.
Sometimes that's all a project needs to be.
Recent Comments